I love to fiddle around with a lot of different artistic ventures so I decided that I would blog about my different projects that I have and will do. I hope that everyone will enjoy seeing some of the fun things that I have worked on.

Wednesday, December 21, 2011

Twix

Having been a Pastry Chef for oh 10 years now I am sure you can guess that I love making all kids of sweet things. Today I decided to try my hand at home made candy bars. My favorite is Twix, so I made them.

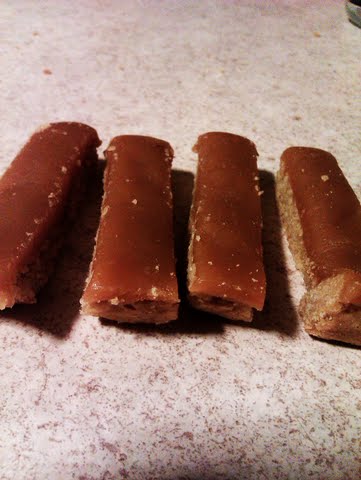
I started by making a Brown Sugar Shortbread for the cookie part of the candy, then as they baked made my Caramel. Now you can go out and buy the little caramels and melt them and use that but for me homemade is always better. After the Shortbread was out and the Caramel was done I poured the Caramel on top of the cookie and put the whole tray in the refrigerator to set up. 30 minutes later they were ready to cut and dip. Dipping is easier if the bars are cold.

Shortbread:
Ingredients:

1 cup salted butter, softened
3/4 cup light brown sugar, packed
2 tsp pure vanilla extract
2 cups all-purpose flour
Preheat oven to 325°F.

In a large bowl cream butter and sugar with an electric mixer at medium speed. Scrape down sides of bowl. Then add vanilla and flour, and blend thoroughly on low speed.

Spread dough out in a cookie sheet

Bake for 17-19 minutes or until the cookies spread and turn a light golden brown. Transfer to a cool, flat surface.

Caramel:
Ingredients:

1 Cup Whipping Cream
1/2 Cup Light Corn Syrup
1/2 Cup Brown Sugar ( Firmly Packed)
1/3 Cup Granulated Sugar
2 TBS Butter ( Softened)
2 tsp Pure Vanilla Extract

In a 2 quart heavy bottomed sauce pan over medium heat, combine the cream, corn syrup, brown sugar, granulated sugar, and butter. Stir until the mixture come to a boil (5-10 minutes).

Increase the heat to medium high, place a candy thermometer in the pan an cook mixture until it registers 246 degrees F. (15-20 minutes), stirring Constantly.
Remove pan from heat and pour on to your Shortbread, refrigerate until firm.

Cut into strips then into candy bars. Then dip in Chocolate of your choice.


When I cut my bars I had 2 rows of regular sized Twix and 1 row on Mini Twix.

Thy are to die for!!!!

Monday, December 19, 2011

Pinching the Pennies

Today I was sitting at my computer looking at a site I love, as many of us do, PINTEREST!

I am sure a lot of you know what this site is. I know it so well I have to give myself a time limit as to how long I can participate. Although I have found it to be addicting, I have also discovered many great ideas and inspiring people.

As I was looking at all the wonderful things, I saw a pin for homemade laundry detergents. I have seen these before on Pinterest and not once looked at them, but for some reason today a voice in my head said just take a look.. I went to the site and as I looked over the recipe and the directions for making the detergent it hit me...Why the HECK am I spending $40 a bottle for 112 some odd loads at $2.80 a load,when I could make it for pennies a load.

I immediately went to my local Grocer and bought the supplies I would need to make my own detergent.. After doing the math I have found it costs $2.61 for 16 loads, this means it only costs $0.16 pr load. So for 112 Loads it would only cost me $17.92. That is a savings of $22.08. WOW!!!!! I will never buy detergent again! So now on to the, How To!

It is really very simple. You will need the following things before you begin.
-1 Box Borax (makes 9.5 batches)
-1 Box Washing Soda ( makes 5.5 batches) (Arm and Hammer) not baking soda
-1 Bar of Soap (of your choosing) I use Dove.
-1 Large pot (must hold more then 2 gallons of water)
-1 Grater
-1 Funnel
-1 Long spoon


I went to Goodwill and bought a pot, grater, funnel and spoon and only use them for making detergent and other soaps.

-Start by grating 1 bar of soap and placing in the pot with 1 gallon of water and melting. after soap has melted, add 1 Cup of Borax and 1 Cup of Washing Soda, stir and bring to a boil. Take off heat and add another 1 gallon of water. Using the funnel pour your detergent into Gallon water jugs or your old detergent container if you saved it. It will thicken over night. Use 1/2 Cup per load.


* All these ingredients can be found at Walmart or most Grocery Stores in the Laundry isle.

Wednesday, December 14, 2011

My Gifts for Christmas

OK, so I have got my gifts for Christmas all done and wanted to share how easy it was to do. I started by making homemade Hot Cocoa mix from a recipe that I have work on perfecting for a while now. So good!! You can use one you find online or you can do some experimenting and make one your self. Basic ingredients include, Unsweetened Cocoa powder, Powdered sugar and Dry milk. Then I made home made Marshmallows. I had never made them before so I thought they might be hard, but they really are not and was very pleasantly surprised to find that they were fun to do to. I placed the Coco Mix in the bottom of a mason jar then put in the marshmallows on top. I combined small mallows with some big ones that I painted on Snow men faces with food coloring. Then capped the jar and added some raffia and ribbon and to finish it off I wrote the instructions for making the coco on the back of my cute little snowmen tags I wrote about in a n earlier post.

Sorry about the poor quality of the Photos my camera died right before this and had to use my phone.

Wednesday, November 23, 2011

A head start on the Holiday.

I Decided that I would get a head start on the Christmas hustle, There are a lot of fun ideas and crafts out there and had a hard time picking just a few. But I settled on a great idea for my neighbors and friend gifts. Something I love to do each year for the people in my life that keep me sane. I am making these great little jars of home made Hot Coco mix and topped off with the most adorable home made Snowmen Marshmallows, and Tagged with these great little Snowmen tags that I made. I love it and am excited to share it with the people I love.

Wednesday, November 2, 2011

Trick or Treat!!


Halloween was a blast. We went all out with our decor and the kids loved their costumes. All made or painted by hand.

The decor was made up of home made cemetery sign, tomb stones and of course ghosts out of milk jugs. We had all the usual suspects, like Jack-o-Lanterns, spiderwebs and huge spiders and spooky music to top it off.


Texas decided he wanted to be Hiccup from How To Train a Dragon. I took Foe Fur and folded it into thirds and cut out holes for his arms to make up the vest, and trimmed it with black foe fur for the belt and boots and topped it off with Leather strings for accent. He was adorable.


Lizzy saw a picture on Pinterest and told me she wanted it so we made her an adorable Scarecrow! The cutest ever I might add. I bought 4 yards of each color toole to make up the skirt with raffia and ribbon as an accent. My mom made the Hat out of felt and painted on the patches.


I hope all had a great Halloween!!!


Saturday, October 22, 2011

Happy Birthday Lindsay

I was given the opportunity to make a cake for my sweet niece Lindsay. She requested that her party be in blue and butterflies so I complied. How could I say no to a beautiful girl like this.


The cake is a blue swirl confetti cake with chocolate buttercream filling. I started by making a 2 layer sheet cake and carving it out to make the flower. The butterfly is made from a six inch round 3 layer cake and cut in half and the halves turned around to make the wings. I then carved out the shape and used the scrapes the make the butterflies body.


I finished the cakes with some contrasting colors to help it to pop. There are no fancy techniques here just frosting swirled on with a knife. I did use a grass tip for the center of the flower and painted orange food coloring on the piping bag to get the orange highlight on the yellow center.


Happy Happy 15th Birth Day Lindsay!!!

Wednesday, October 12, 2011

Craft Time

I am always in the mood to craft, it seems that finding time to do it is scares. So I decided I would have a super Saturday of my own for my Family and a few friends. For those who don't know what a Super Saturday is, it is a day, usually Saturday that a bunch of woman usually get together in our church and craft all day. It is tons of fun and you get to have a day without the kids. I got to get a lot done and have some great holiday decorations to show for it.
All of these ideas came from Pinterest, So thanks to those of you who shared.

First I made these great pumpkins out of 4x4's. So simple and takes almost no time. I had a 4x4 beam in my back yard so this craft cost me nothing!! The wood is cut into lengths of 19", 17" and 15". I got 2 sets out of an 8 foot 4x4. I sanded them down and painted them the Orange I liked, also using a little brown to go over some spots to help give them and aged look. After the pumpkins were dry I sanded them down with an electric hand sander for further distressed look. Got sticks from the dead tree out back the stems, Wire to wrap them together, ribbon and rafia for decoration. I love them!!!!


This is the one from Pinterest


These are mine


Next I made this adorable Snowman Family. They are out of 2x2's and cut into 2", 3 1/2", and 4" lengths for the Head Body and Bottom of each. You will see that the little one only has 2 blocks. and they are 2" and 3 1/2". Arms are twigs from dead tree, Scarfs and bows made from burlap. Fronts of the snowmen are scraps of paper that are decoupaged on. Buttons are wire.


These are from Pinterest.


These are mine!


I know they do not look exactly alike but for the first attempt and with out instruction they look great!!!! I look forward to having another craft day were I can make some great stuff for the next holiday!! There are more posts to come on my Super Saturday makings.

Wednesday, October 5, 2011


I absolutely love Fall, and especially Halloween. It is my favorite time of year and holiday. So it goes without saying that I enjoy making and decorating for the season. Here are my first projects for Fall 2011. I am sure there will be more to come.

!. 2X4 Pumpkins, Cut and painted 2x4's. I had scrap wood and put it to good use. This craft cost me Absolutely Nothing!!! Great price Huh?

2. 2x4 Halloween spooks. Cut at different heights and paint their respective color. Mummy is wrapped in Fake Spider web I had in closet. Pumpkin has a stick from the tree in the back yard for its stem.

Tuesday, September 20, 2011

Fall Fancies


Fall has always been my Favorite time of year. The beautiful leaves on the trees, the wonderfully crisp, cool mornings that turn into crystal clear days where the temperature is neither too hot or too cold. So it probably gose without saying that decorating for this season is the funnest for me. I found some great little projects that I just finished to do to decorate my home. I painted an already made figurine, and made the cute pumpkins. I used a stencil for the Vinnie background after painting them the desired colors. The vines are thick black wire and the leaf is a metal leaf I bought at the craft store. The Lettering is Vinyl and the G is a wooden letter I also bought. I cannot say that they were 100% my creation, because I take a lot of inspiration from things I see in stores and then make them my own.

Wednesday, September 7, 2011

She is on her way!

My cousin Maribah and her husband Kyle after many sad losses are finally going to be blessed with a beautiful bundle of joy from Heaven. Knowing exactly what they have gone through, having gone through the same trials I can say in all honesty that it is the best thing in the world to be carrying this special spirit. Even with all the illness and pain you endure during pregnancy. It is a blessing every day you carry that precious one. I am so excited for them I can not express.

I decided that I would like to participate in throwing a baby shower for them with my Sister in law Laura Nava. So i have designed the invitation.and here it is!

Friday, September 2, 2011

Tamales,Tamales, Tamales!

Tamale Recipe

5 Lb Whole Chicken ( i use skinless, boneless chicken breast)
1/4 Cup Chicken Base (Not cubes or dried chicken flavor)
3 Oz Chino Peppers (California Peppers, Dried)*
1/2 of a 7.9 Oz Jar of Caldo de Tomate*
2 Yellow Onions
2 Heads Garlic
4 Lb Bag Maseca for Tamales*
2 Bags Corn husks *
Water
Reserved Chicken cooking liquad
1-2 Qt Manteca (Lard)*

Instructions for Chicken: In a slow cooker or a large pot place your whole chicken and cover with water about 2-3 cups above the chicken, add Salt, pepper, 2 Chino peppers, 1 head of Garlic and 1 Onion. This all helps give the chicken flavor. Cook all day until the meat falls off the bone. Take chicken out of pot and let cool, then shred and set aside in a bowl.

Instructions for Sauce:
In a medium sauce pan add 4-5 Cups Water, Chicken Base, the remaining Chino peppers, Caldo de Tomate, Onion and Garlic. Bring to a boil and cook until peppers are soft. Take out the stems and place the mixture in a blender and blend until smooth. This mixture will have a very strong flavor, so as to give the chicken more flavor . Pour the sauce on top of the chicken, cover and set aside.

Instructions for Maseca: Pour half of your Maseca into a large bowl, season with salt and pepper, in a pot pour 4 cups of your Chicken cooking liquid and half quart of Manteca and heat until fat is melted. Using a small amount at a time pour your liquid into the Maseca, mixing with your hands. Continue to add liquid until the mixture is like Very Soft Play dough. Then add a little more for absorption.

Assembly: After soaking your Corn Husks, drain them. This makes them pliable. Place a husk in front of you on the counter and take a hand full of Maseca and smooth it out just in the middle of the husk, leave space on the sides for rolling. Add a small amount of filling and roll one side over then pull back the husk a little and roll the other side up onto the first side then fold in the bottom of the husk and complete the roll. Place flap side down in a cake pan until ready to cook. Repeat this till all the meat or Maseca is gone.


Cooking: Have a large steamer pot or a pot with a strainer that dose not touch the bottom, with water in the bottom on the stove heating to a simmer. Place your tamales in the pot in a single layer. I place mine on end so I can fit more in the pot. Cover and steam for 15- 30 minutes. They will be done when the Maseca looks shinny and wet. It will also be firm. Enjoy!!

Variations on a theme: You can also use shredded pork or beef. Instead of a red sauce you make a green sauce using canned Green Enchilada Sauce.

This recipe makes 60-100 Tamales and can be assembled and frozen uncooked in plastic wrap and ziploc bags. Make for great on the fly meals. I make homemade re-fried beans at the same time as tamales and freeze it as well so I have a complete meal.

* Tips: To get the Best products you will want to go to a Hispanic or Mexican Market. (Yes you will probably be the only "Greengo" in there) but be brave. They have the freshest and best of the products that are indicated above with a * The Manteca is essentially the drippings from their cooking of Carniasata. It adds flavor to your Maseca that Lard will not do. Go to the butcher counter and ask for it. Bring your own Quart jar and they will gladly fill it. Usually for free, but do not pay any more then $4.


Sunday, August 28, 2011

Mini Magic!

So, my whole life I have been in love with pretty much anything in miniature. So it is appropriate that I went to a card making class and did all miniature cards! Love them and cant wait to create more.


Thursday, August 25, 2011

A Summer Cake


My little sister Summers cake was one for the books. Many months of planning and work went into this Sartell Girls masterpiece.
Summer's original drawing she had kept and worked on for many years.

Summer Heather’ cake was a three-month production from start to finish. We actually were trying re-invent the wheel with this eye-popping cake. Summer had drawn and re-drawn her cake for four years. This is the original drawing. I'm sure glad she is the last child and this was our last wedding to plan and implement.

We, Darcy and Summer and SK believe we can do ANYTHING…Hmmmm

Summers original scaled drawings were sent to a silk-screening company in California.


The Cheap Transfer Sheet Company.

They laser cut a stencil and used the stencil to paint real chocolate powder onto Mylar sheets.
The sheets of chocolate designs on clear Mylar were sent to us and then the real work began.


We designed a mold which could be adjusted to different lengths. Lay the chocolate transfer sheet chocolate side up of course. Tape it securely. We taped the metal stainless steel flat rods to the length according to the sizes needed for the finished product. Our biggest was 4″x16″ by 1/4″ deep.

In a double broiler we melted pure white chocolate and stirred till very smooth, then poured it into the readied mold. A stainless steel scraper was used to pull the melted chocolate over the mold. Not overworking. Then scraped the excess chocolate over the edge to re-use again.

Each mold configuration was made to match the cakes layers. I made 8 sets for each cake layer. which there were 4 layers soooo…that makes a total, ahhh? 32, 1/4″ deep by 4″ tall and 5″,7″,16″,18″.

When the chocolate had cooled and hardened, we slipped a cake decorator spatula under the mold, wax paper and hardened chocolate. Very gently lifting up. We used a warm knife to cut around the edges of the mold to loosen the chocolate from the mold.Turning it over you can see the transfer sheet with the dark chocolate drawings. Peel the transfer sheet off very carefully and the design stays on the white chocolate. Some hits and misses can be expected so we made an extra 10 just for any last second emergency. We so glad we had multiples of left-overs on hand. In transit some of the “sidewalls” came loose from the actual cake and shattered. We were able put up new walls when we arrived at the venue. ( I learned from the best, Ron, my dad is a custom general contractor). New walls? No problem. We kept all the finished pieces cool and dry till ready to use.


The chocolate walls were “glued” to the crumb coat frosted cake (which by the way is just a first coat of frosting decorators use to control cake crumbs from getting into the final frosting coat.)

We used white royal icing to “glue” the walls to each side of the cake layers. We all know there isn't a cake out there actually square, plumb or level. We had to adjust the walls by filling in behind areas with royal icing. using a metal square to keep an eye on the level, plumb and square issues. A ribbon was used to tie the walls to the cake till they were dry and sealed. When all four layers were stacked and stable

I started the piping which ran around the base, corners and edges of each layer. We used black butter cream icing. When this task was completed mom set about the next phase: Fresh flowers.

http://sksartell.blogspot.com/


Oh by the way the bottom layer of cake is a plywood box with holes drilled in the top and dry ice inside to protect the three upper layers of cake from the heat. We just decorated it to look as if it were cake. Try cutting into that layer with a cake knife…

As the cake was in its last minute "project" phase, the bride hovered...having to add her two bits.
Who would have known this day would hit temperatures over 100 degrees. As we battled on, tempers ran a little short and we needed to keep the cake as cool as possible.


But onward and upward we prevailed. The end artistic masterpiece was complete.


Thanks for joining us in the journey..

The Sartell girls had fun...Forces of Nature Is What We Are...